3.11.2015

felted dog bed

I have two dogs that have made their appearance in my blog (& instagram) from time to time. Well last year we had to break them of the sleep on furniture habit as we purchased new couches for both our living & family rooms. I couldn't let my pampered pooches make them become glorified dog beds this time around. Yeah sure, once in a while in the family room is okay, but not on a daily basis and never if we aren't around. It was a hard learned lesson for my pups but I think we have succeeded in getting the message across.

Enter the new dog bed. My dogs are pretty simple creatures. Most days they want an old pillow or a crumpled up blanket to sleep on. That's when I remembered seeing this post on apartment therapy.


Back in my hard core thrifting days I managed to amass a nice selection of sweaters for felting, no doubt for some great craft idea that has come and gone. It was back in the days when I made a couple of felted bunnies for my wee girlies. I hung onto the sweaters in hopes that I would be re-inspired to use them and I can say that this is probably one of the first times that has actually worked. I set to work cutting up the felted sweaters into various sized squares. Sewed them back up in a patchwork style. The final product needed to be large enough to cover an old pillow front to back. Next I sewed the one long edge (the other long edge is folded) and short end. I left an opening on the opposite short end for the pillow to be inserted, and I sewed a strip of velcro on the short end for ease of opening and closing in case I need to add a new pillow or things need to be washed. (Best part about the washing thing is you can easily use hot water with no fear of shrinkage as it is already felted). Check out the apartment therapy post as it has step-by-step instructions.

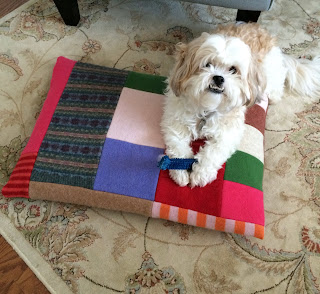
Really super easy project start to finish. And I think it might be a wee bit more attractive than seeing an old white, naked pillow laying on the floor. It is Lily approved too! Now to get busy on the second one.


3.09.2015

somewhere far, far, away...

Have I ever told you how much I love Heather Ross' fabric? I mean love. I have quite a few of her fabric lines sitting in my fabric stash. They are just waiting for the perfect project - crazy right? I know it. I totally realize how ocd that is and I'm trying to curb that tendency to hoard save fabric. I mean for gosh darn sake, it's only fabric right? (I really want to think that way. I mean what is the point of buying fabric if you aren't going to use it?)


I have long realized that collecting fabric, for me, is just as much fun as sewing the fabric. But after a while collecting without using can also become a burden... and burdens tend to be life sucking. So in the interest of fun, I finally cut into my precious Heather Ross Far Far Away II fabric. 

A bit about the fabric: it was originally printed by Kokka fabrics and I'm hoping it will be re-printed - like the princess and the pea was - in quilters cotton. I'm sure I'll be all over that line if it comes again, but I digress. The fabric is a hefty 80% linen/20% cotton blend which tells me off the hop that is is going to be sturdy. Nice for some crafty functional projects.

First thing I needed was that perfect project *cough, cough. Since my girls have been in need of pouches for their pencils, erasers and such, I thought this would be a good jump off point. This usually starts with a quick drawing in my sketch book and then onto prototype stage made from my endless vintage sheet supply.


Once I tweaked the project I was all set. Armed with my rotary cutter and a new "use it up" attitude, I took a deep breath and cut into my stash. And you know it wasn't too painful. The fabric, both the fabulous art and weight were a great choice for my girls' pouches.

Miss A's pouch: front


back


Miss J's pouch: front


back